

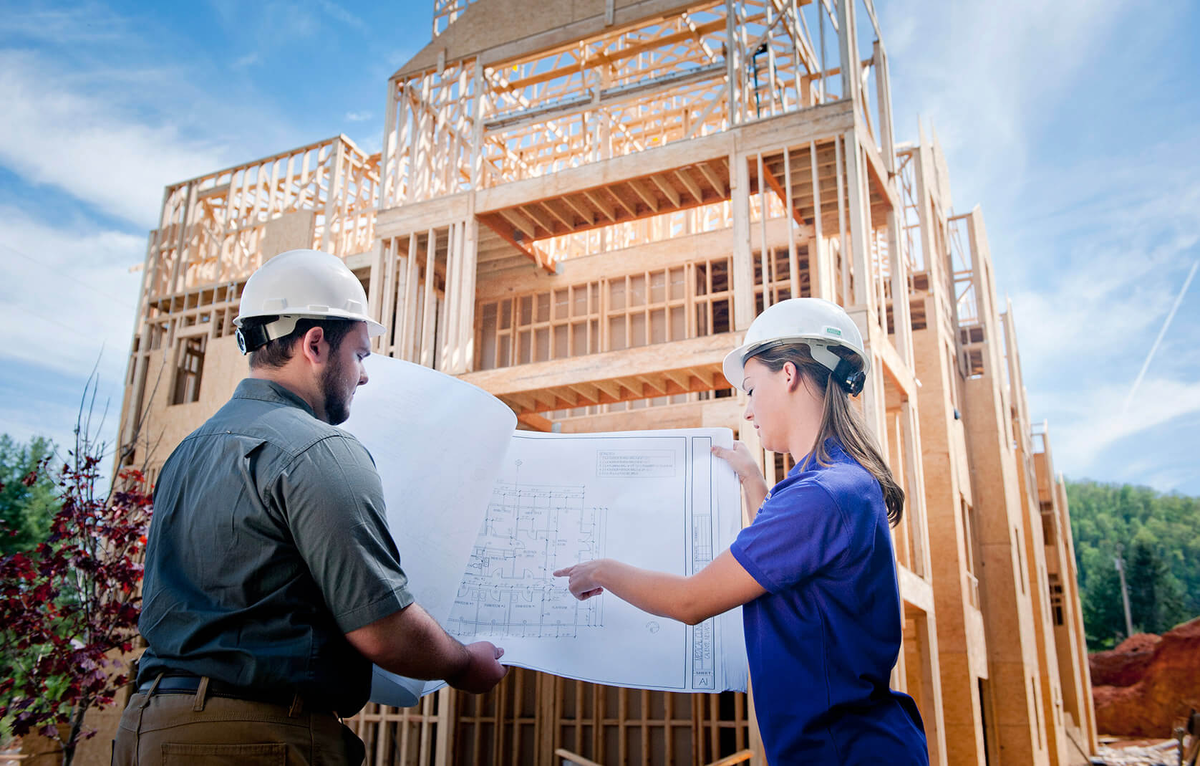
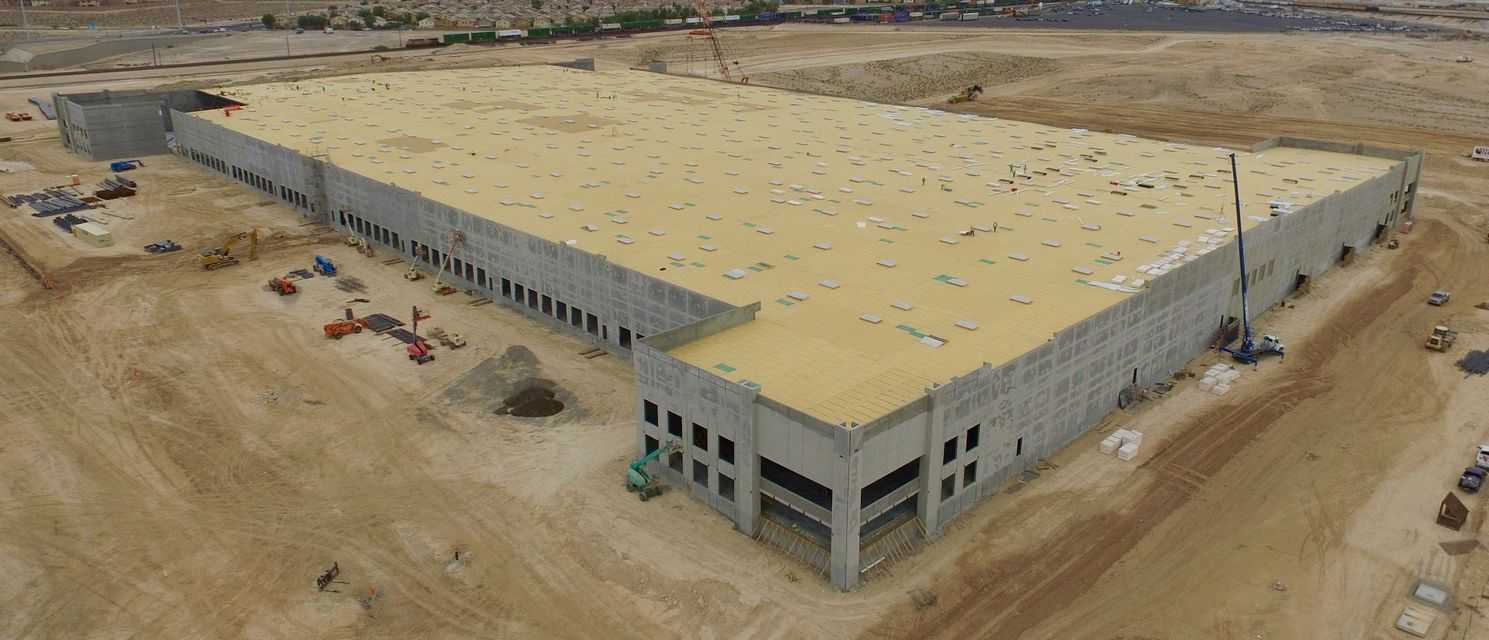
What Is Tilt-Up Construction?
Tilt-up construction is a technique that facilitates construction, making working with concrete a quick and convenient job. It involves the casting of concrete elements such as walls, pillars, and supports, horizontally on top of concrete slabs. This includes the building’s floors, and other temporary concrete castings, to be set on a flat surface.
This feature makes tilt-up construction the perfect choice for construction projects mid-city.
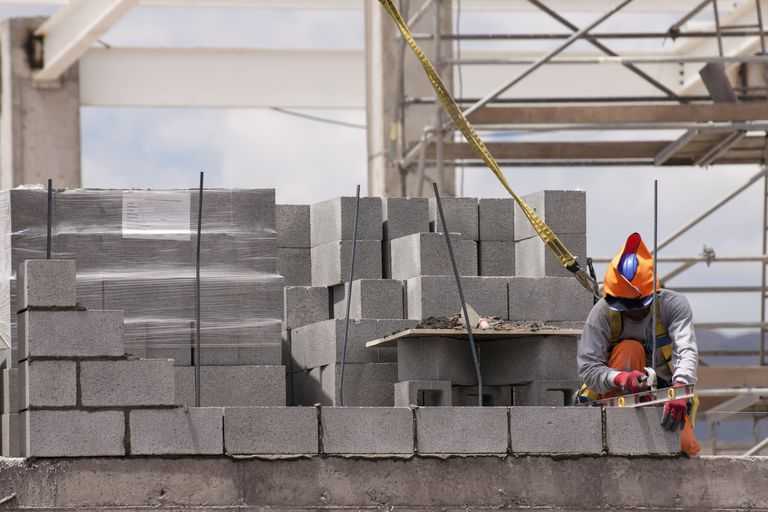
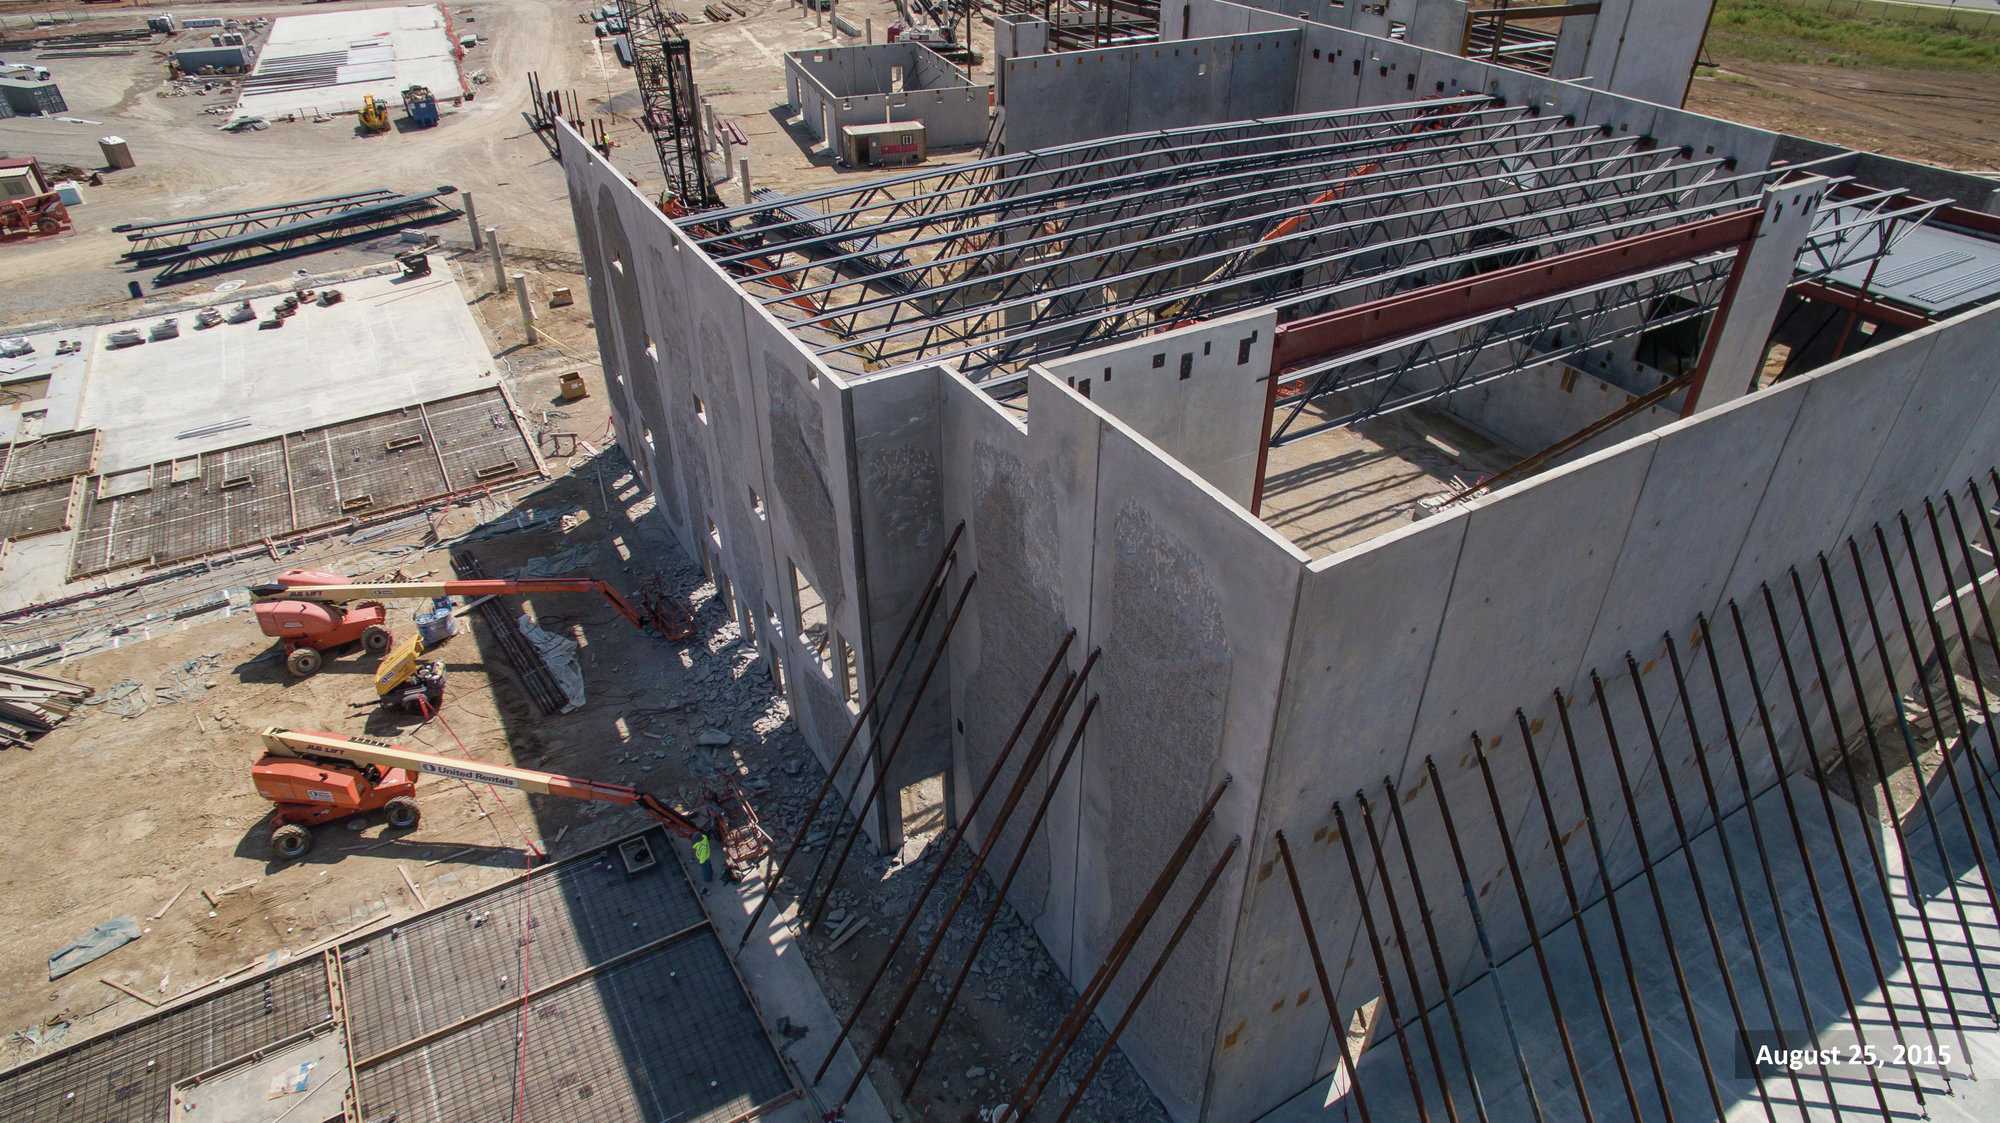
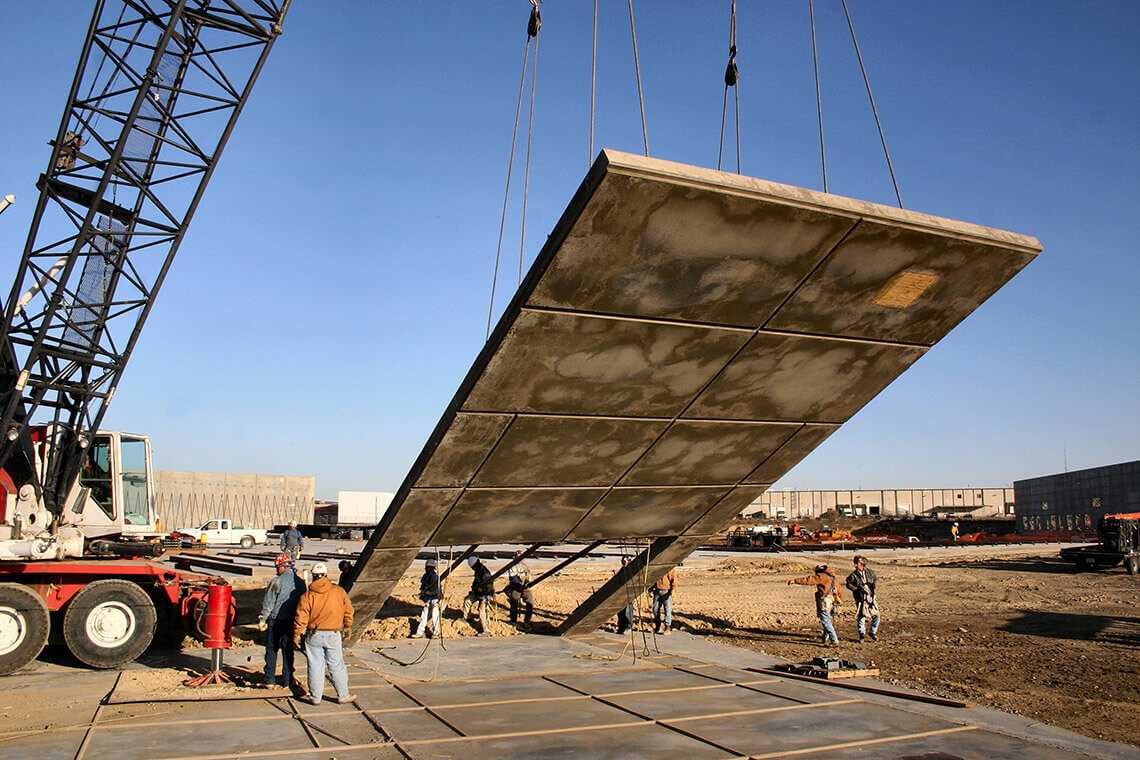
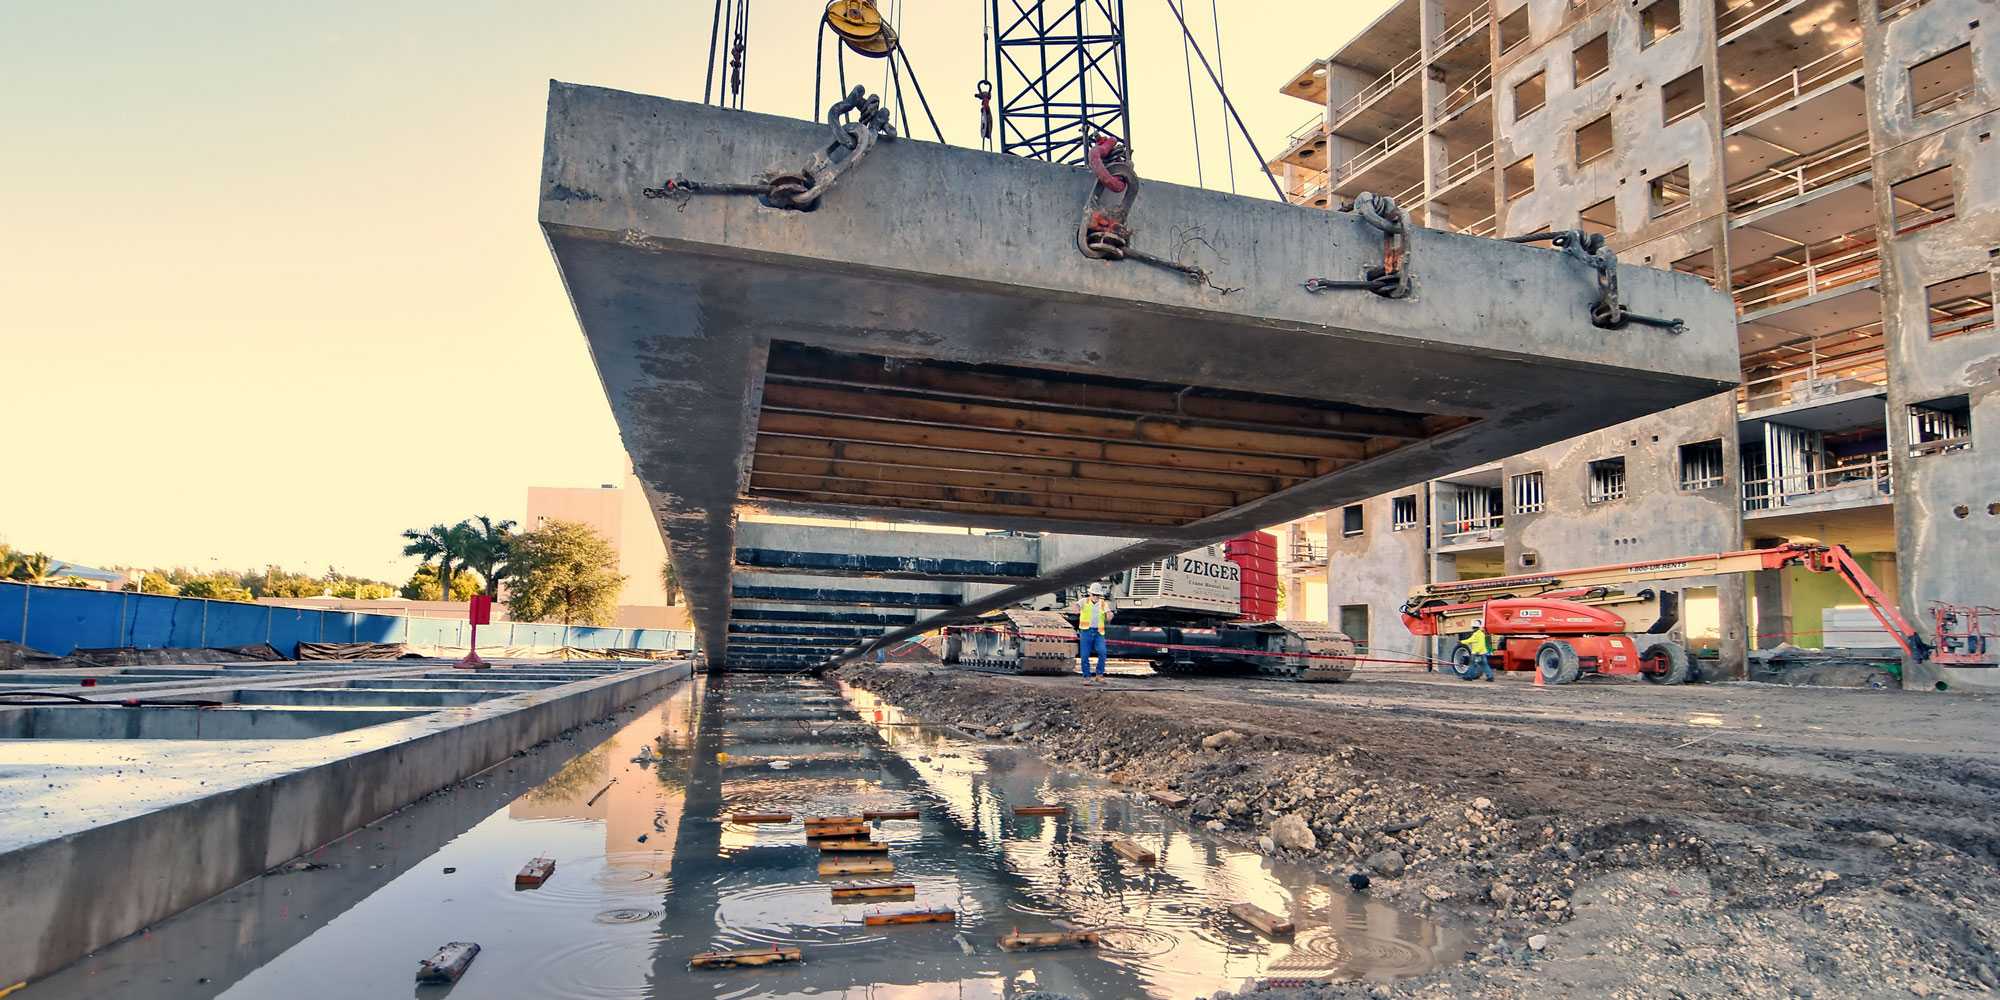
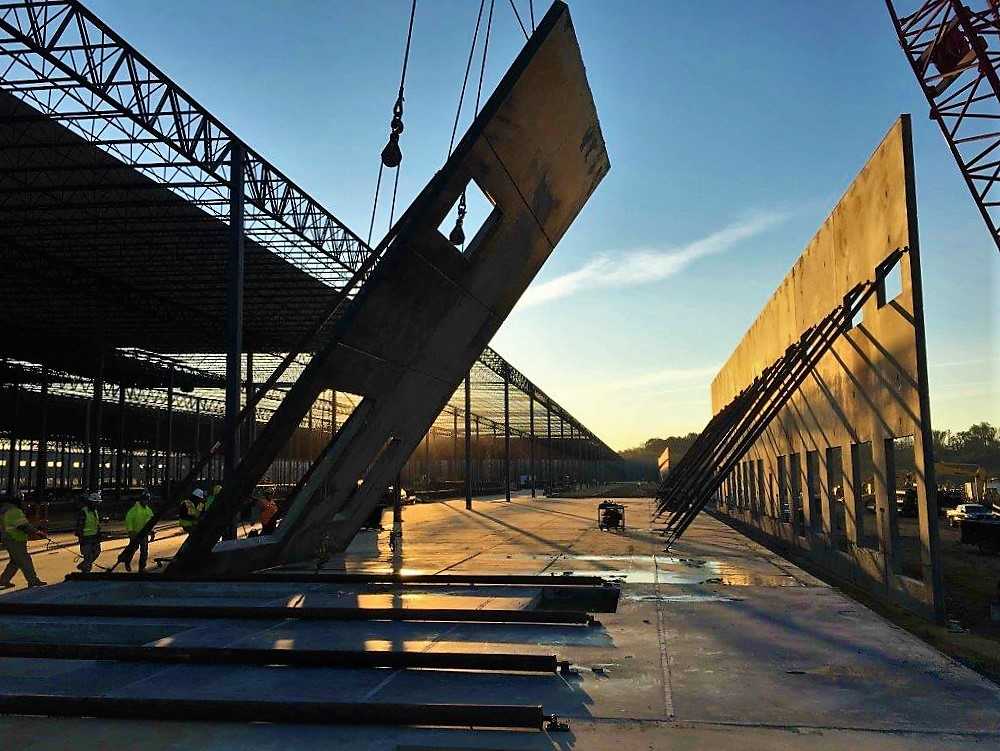
Once the cast has cured, the elements are cut to size, concrete and rebar alike, and then ‘tilted’ to the vertical position with the help of a crane. Once it stands up, the bases are braced and secured in place with concrete. The braces stay in place until the rest of the structural components, including roofs, intermediate floors, and sidewalls, are set and secured.
The method has gained popularity in Northern America, Australia, and New Zealand. Its usefulness is found not only when erecting retaining walls and supports on-site, but also for casting concrete elements at factories.
The detailed process of Tilt-up construction
As stated, Tilt-up is composed of 3 steps: design, construction, and vertical panel lifting. Here is a detailed explanation of the activities that take place in each one of them.
Design.
- In this phase, you define the dimensions, shape, and overall design of your future walls. Panels can be produced in many shapes and sizes, including flat and curved. The limit is the creativity of the designer and the overall weight of each panel.
- To have an efficient panel erection, you also have to make a layout of how your panels are going to be laid down before lifting.
Construction
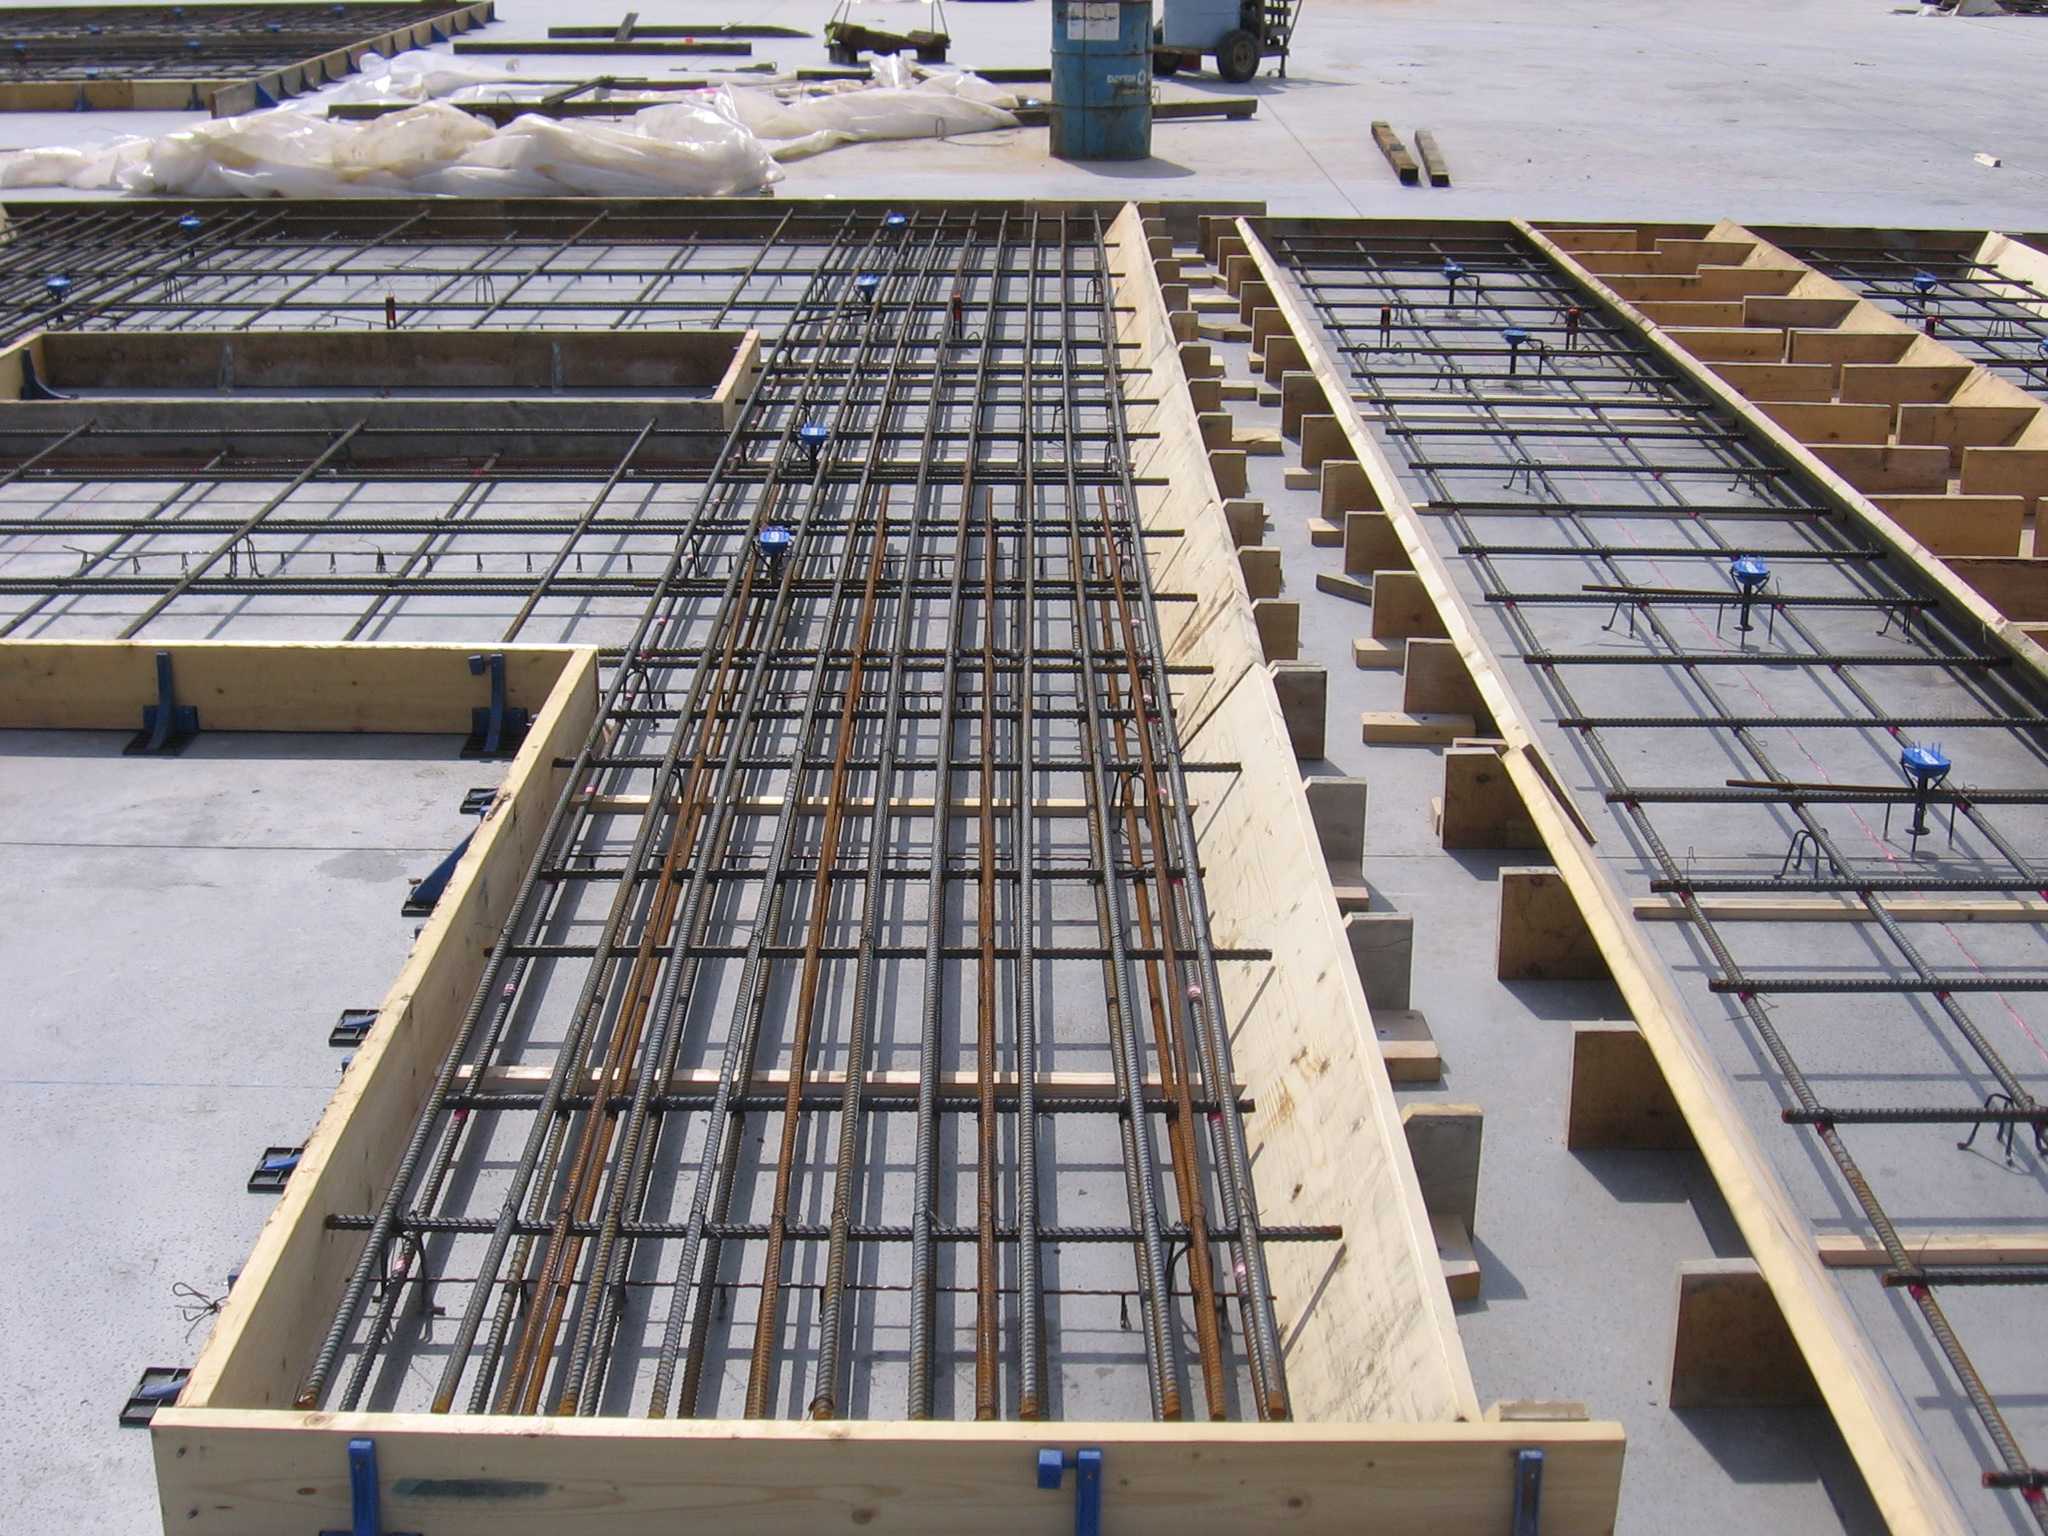
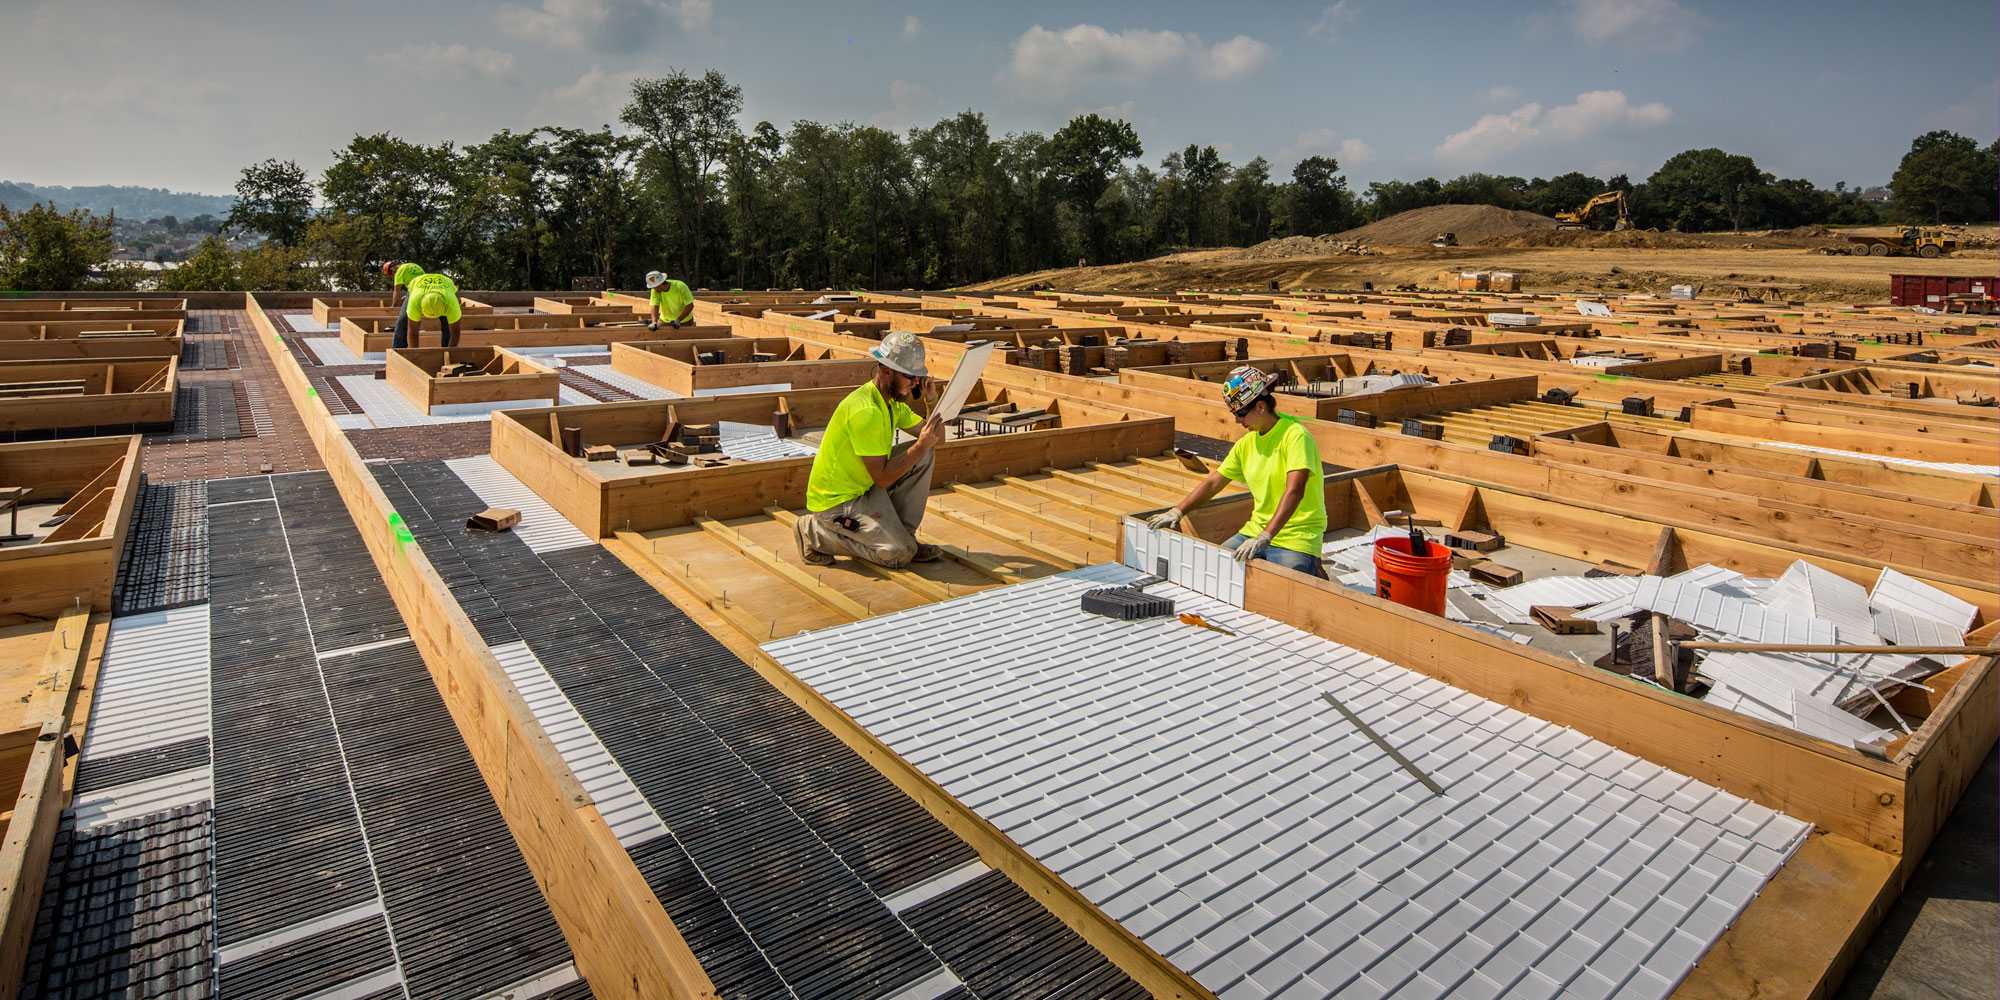
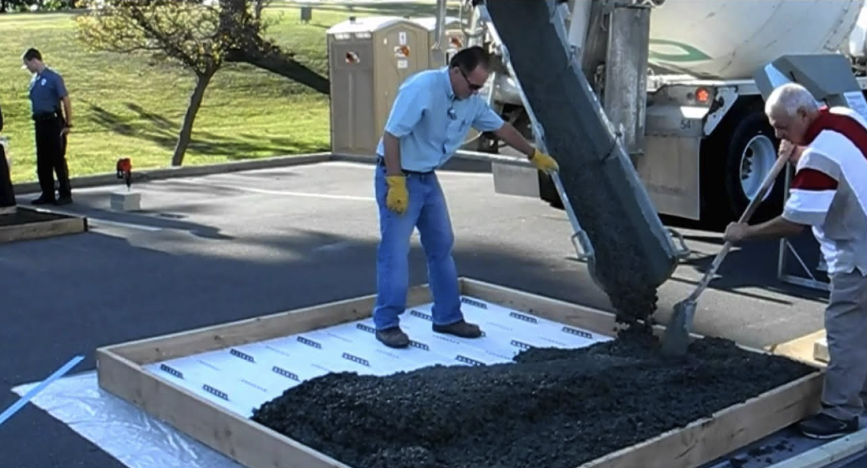
- The first thing to do is to prepare the tilt up concrete slab where the walls are going to be built. Then you can start positioning the panels in their planned place.
- The wall panels are drawn, shaped, assembled, and molded on the concrete slab, including the components needed for moldings, architectural features, windows, doors, logos, installation steps, and placement of embedded connection to structure before the concrete installation.
- A chemical reactive bond breaker is sprayed to prevent bonding between the concrete slab and the Tilt-up wall when lifting.
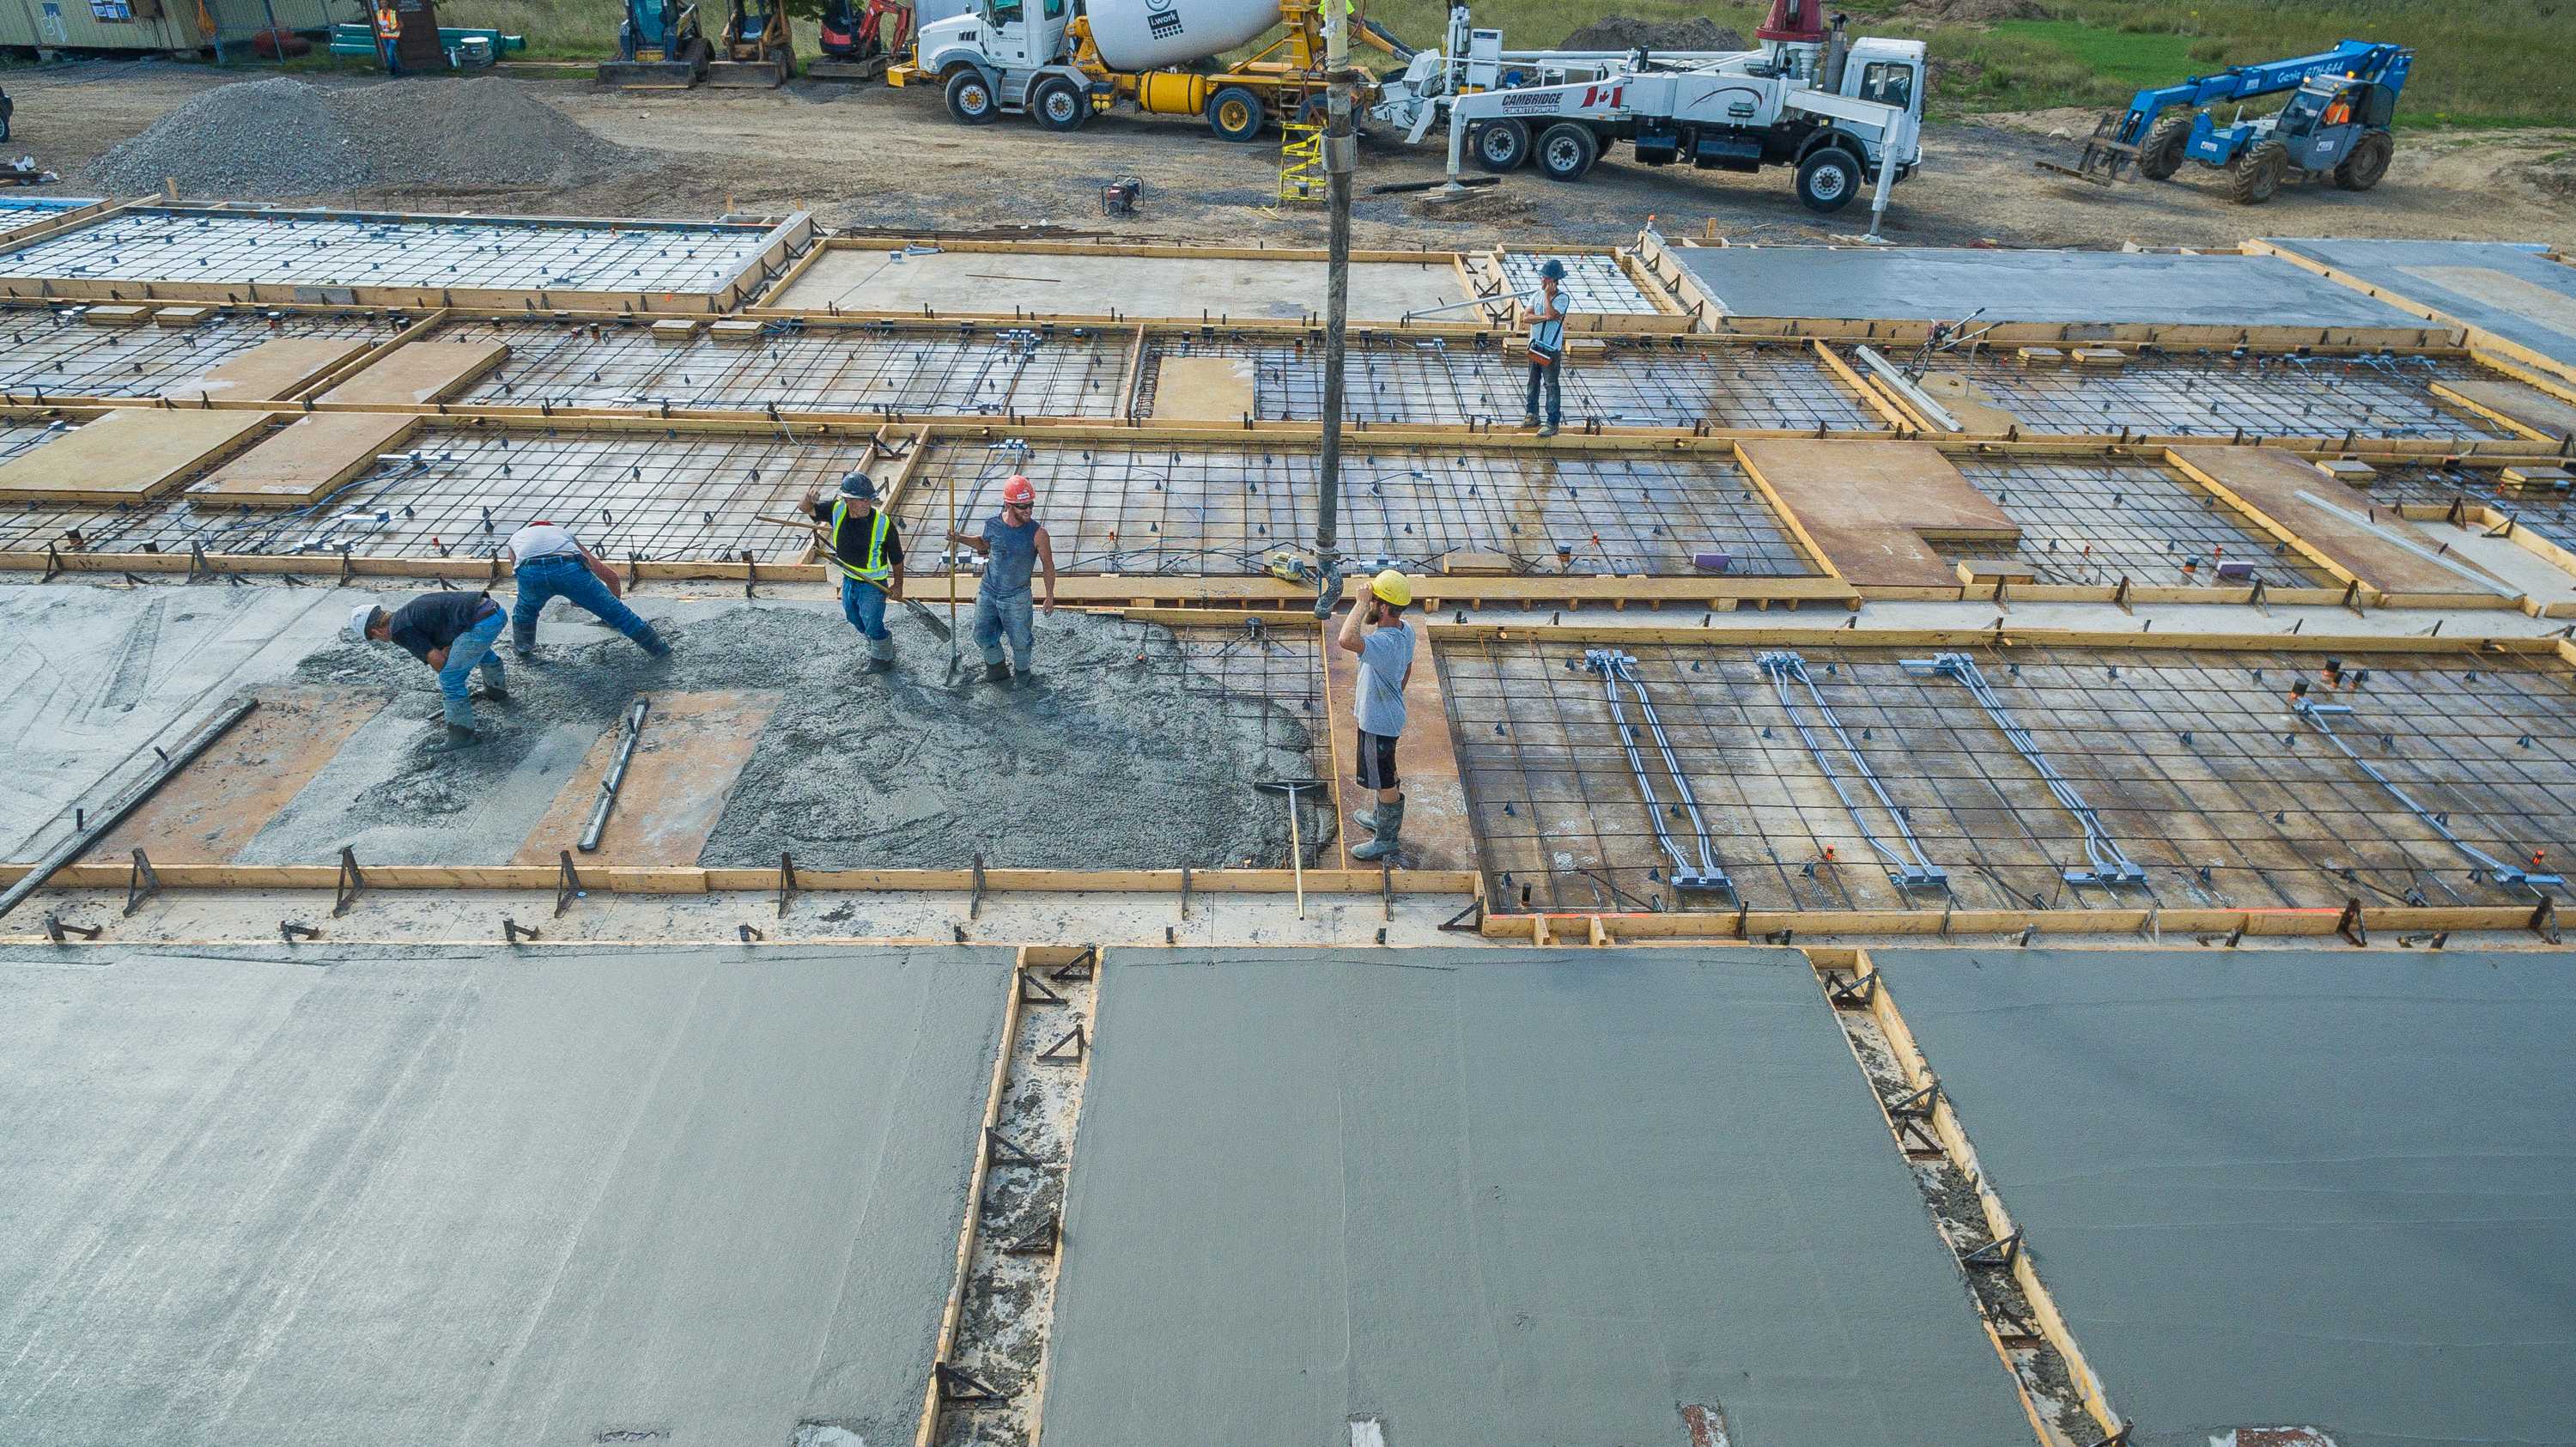
- Then you place the steel reinforcement grid and the concrete casting starts.

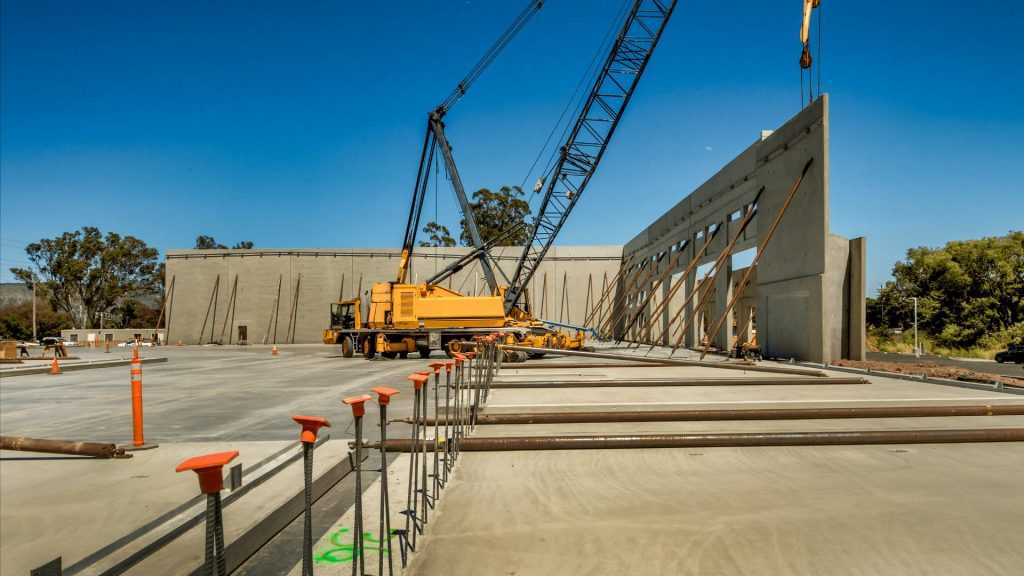
Lifting
- The crane elevates each panel in the planned sequence. They’re consequently put in their correct location.
- Before the panels are released by the crane, temporary braces are installed to support them and will remain until the building’s steel structure is connected and secured.
- Once the lifting is finished, the Tilt-up concrete walls are connected with the structure connections, cleaning and patching the panels. The final step in this activity is the filling and casting of the closure strip.

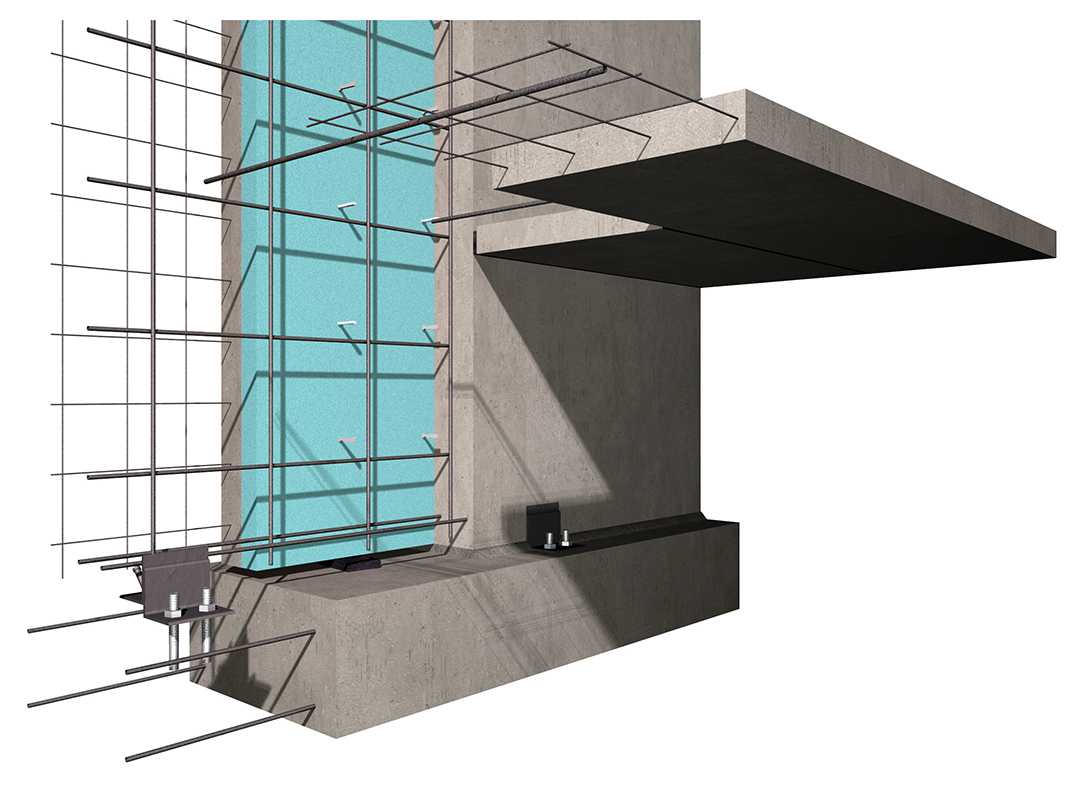
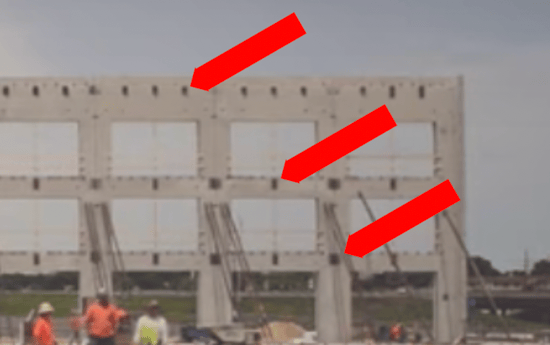
Eliminating welding of the steel beam to the concrete embedded plate and replacing this process with bolting creates numerous advantages specifically for tilt-up construction projects.

Why Weld When You Can Bolt and Save Time and Money?
It’s far faster and easier to attach the clip-angles to the plates using bolts vs. welding. This can mean that a wall panel can be lifted sooner, as the clip-angles can be installed faster, without welding resources. In addition, if weather prevents welding then this operation is delayed. Welding requires approved materials to be carefully stored on site and welding creates visual hazards to nearby workers and potential fire hazards which must be managed. EM-BOLT boltable embed plates eliminate these risks and potential delays.
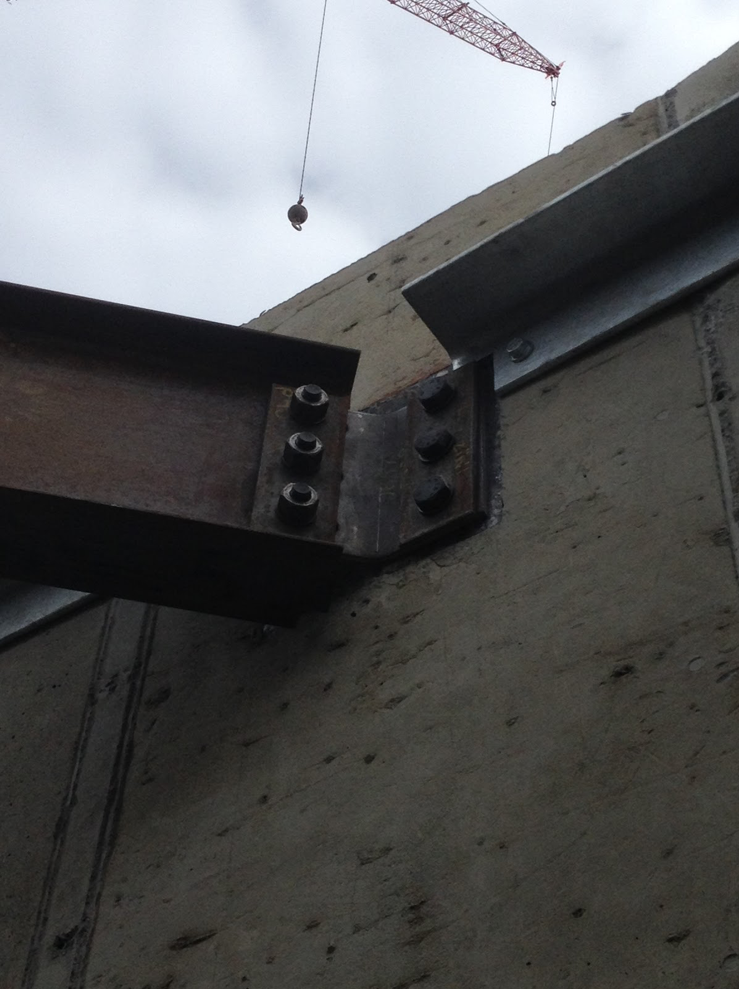
A boltable steel-to-concrete joint can be created using common construction labor, lowering overall project costs and speeding construction.
Welded construction joints require specialized inspection skills and often some percentage of welds need to be inspected at close proximity, further increasing costs as you need to get the inspector physically close to some percentage of the welds. Numerous bolted joint quality systems are available which can be visually inspected at a distance.
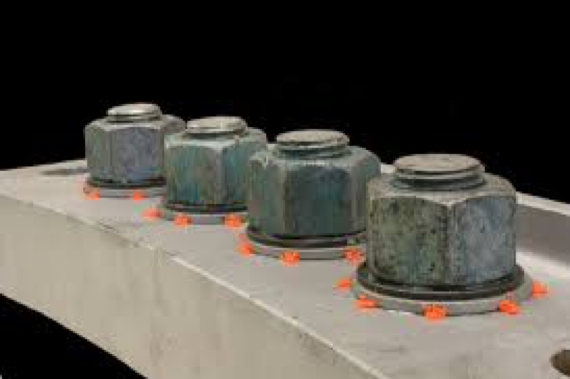
Typical Bolted Connection Inspection Method
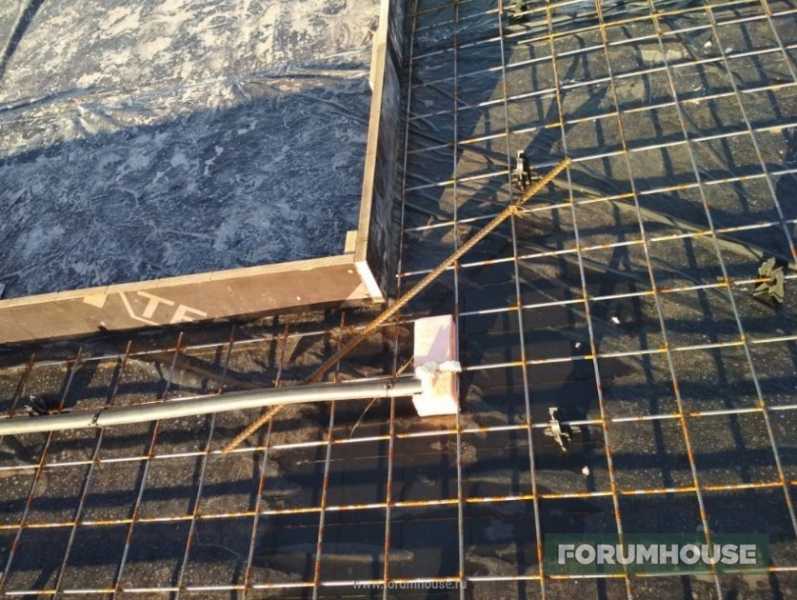
Конструктив, подготовка к заливке
Стены:
- Несущий слой – 120 мм бетона, высота 3,2 м. Утеплитель – ПСБ-С-25, 200 мм, высота 3,4 м. Наружный слой – 40 мм бетона, высота 3,4 м.
Толщина подобрана не методом тыка, а на основе теплотехнических расчетов, проведенных в популярнейшем онлайн калькуляторе – теплосопротивление стены получилось больше чем в полтора раза выше нормативного для региона (Питер).
Съемную опалубку напилил из гладкой ламинированной фанеры, к фундаменту фиксировал металлическими уголками
Самое важное – максимально выровнять нижнее ребро плиты, на котором она будет стоять, так как при сборке между боковыми гранями остается полость (10 см), заливаемая бетоном. Верх тоже не особо проблемный, так как перекрытие будет бетонное же – монолитно-ребристое (балка 200×200 мм)
Благодаря этим вводным с выставлением опалубки на ровной плоскости фундамента проблем не возникало.
Армирование металлической сеткой (100×100×5 мм), усиление прутом d10 по периметру и вдоль петель, плюс, петли усилены дополнительной поперечной арматурой. По углам оконных проемов тоже поперечины, чтобы предотвратить растрескивание, над большим окном в растянутой при верхней нагрузке зоне – два прута. В первые самые тяжелые плиты для подстраховки также добавил сетку 100×100×3 мм, но она особо ничего не дала и позднее от этого приема отказался. Сами подъемные петли из гладкой арматуры d20, делали на заказ, а закладные для фиксации панелей самодельные – приваренные к уголкам отрезки арматуры. Так как с сейсмика спокойная, количество тросовых петель на стыках сегментов Yuri5 уменьшил с рекомендуемых семи на каждые три метра, всего до двух. И не забыл при сборке «болванок» вставить фрагменты пенопласта с трубой ПНД под розетки, и также вывел трубу из утеплителя в верхний слой. Полная готовность к заливке несущего слоя.
Design Possibilities
Although concrete construction doesn’t offer as much customizability as metal construction, it does offer some real advantages in terms of space and its unique aesthetic. The main space-related benefit with high-rise reinforced concrete structures is that they require a less floor-to-floor height than metal structures. In other words, if both a steel structure and a concrete structure are 1,000 ft in height, the concrete one will typically have a greater number of floors. This provides more rentable space for building owners who opt for tilt-up concrete construction.
Furthermore, with proper engineering, the interruptions in a floor plate of a concrete building can be minimized as well.
Although steel structures require a higher floor-to-floor height than concrete buildings, engineers can use techniques such as castellated beam construction, a girder slab, and staggered truss to reduce the floor-to-floor height of the structure. However, when it comes to large floor spaces uninterrupted by columns, metal buildings reign supreme. Because of steels flexibility, builders can address the design requirements in different ways.
External References for Information on Tilt-Up Wall Construction
1. General: For a very brief overview of tilt-up construction, see Tilt-Up Concrete on the website of the Portland Cement Association.
2. General: A slightly more in-depth explanation of the tilt-up technique is available on the Wikipedia “Tilt up” page.
3. General: “Tilt-Up Construction Basics” provides a thorough overview of the subject. Available on the website of the Tilt-Up Concrete Association.
4. General: “TILT-UP TODAY, a publication of the Tilt-Up Concrete Association, is THE source for Tilt-Up industry news, market intelligence, business strategies, technical solutions, product information, and other resources for professionals in the Tilt-Up industry.”
5. Technical: “Connections in Tilt-Up Buildings” is an article in “Tilt-Up Today” that discusses, in useful detail, how tilt-up buildings are put together.
Leveraging BIM
So, let BIM do all the work! By cutting sections at the face of the walls, coordination becomes very easy. The steel and tilt-up elements are all shown in context to one another and errors can be easily uncovered. If you set your view attributes correctly, you can see which members are on the near side of the wall (solid) and which are on the far side (dashed). If you develop an embed naming convention that distinguishes between embeds on the upcast and downcast faces of the panel, you can visually verify that the embed labeling matches the location of the steel members – before the panels get built.

In our case, we use an asterisk to identify embeds on the downcast face. For coordination, we scan the extracted elevations (Figure 3) to make sure all embeds with an asterisk have a dashed member at their location. If a solid member is found, one of the two is wrong and the correction can be made. Figure 3 is an example of a section cut with framing on both sides of the wall.
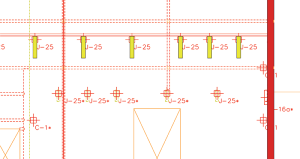
Figure 3. Using BIM to verify embeds and framing in complicated areas.
This composite BIM can also be used to check for errors as well, not just the upcast or downcast location of embeds. Because there are two analysis programs (steel and tilt-up), it’s not unthinkable that a change in one program doesn’t get picked up in the other, particularly while the design is changing. BIM is a perfect environment to do this error checking (Figure 4). This is an example where a new bay was added, the steel framing was modified but the tilt-up embeds had not been adjusted accordingly.

Figure 4. Using BIM to resolve coordination errors for tilt-up construction.
So, BIM can do a really great job of coordinating our steel design and tilt-up design. But, what if we take this a step further to add even more value? What if the quantity take-offs from the tilt-up software were shared with the tilt-up sub-contractor? If the take-offs are robust enough and include all of the items that the contractor needs to price the project – length of forming, gross and net square footage of the panels, length and size of reveals, quantities of embeds, tonnage of reinforcing, etc. – they could all be used at any point during the design to help monitor the cost of the structure. What contractor or owner doesn’t want to know where they stand during the design phases instead of waiting until the design is finished? At any point during the design you can provide a take-off that could easily have dollar amounts applied to it.
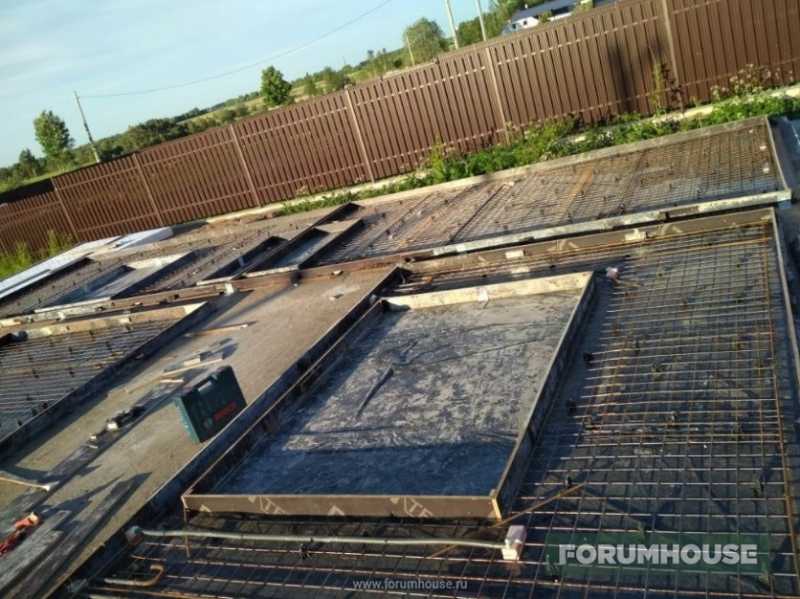
Технология изготовления панели
Весь процесс можно разделить на следующие этапы:
При разметке плиты сразу предусматриваются проемы для окон и дверей. Самостоятельное изготовление панелей позволяет сделать их любого размера и формы. После того, как бетон плит окреп, производится их подъем на место с помощью крана.
Плиты между собой связывают предусмотренными выпусками арматуры по углам дома, а затем эти углы дополнительно замоноличивают
Важно также предусмотреть устройство монтажных петель на верхнем срезе плиты для работы с краном
Таким образом, за один раз выставляют стены целого этажа. Если планируется постройка двухэтажного дома, то кран придется вызвать дважды. Если площадка для строительства большая, то можно сразу отливать плиты высотой на два этажа.
Видео: Бордюр для ванны. ЛИЧНЫЙ ОПЫТ 8 лет. Проблема касается почти всех. 2023
Видео: Бордюр для ванны. ЛИЧНЫЙ ОПЫТ 8 лет. Проблема касается почти всех. 2023
Конструкция стены Tilt-Up — отличный способ строительства, который может использоваться в некоторых случаях, когда стоимость и скорость требуются в процессе строительства. Методология позволяет создавать эти стены в другом месте или на месте и переносить их на место, сокращая трудовые конфликты и логистику на площадке проекта. Этот процесс направлен на сокращение затрат на строительство, ускорение проекта и сокращение трудозатрат на месте.
Смысл имеет смысл использовать наклонные стены?
В зависимости от объема и размера проекта, наклонные стены могут быть самой умной методологией для реализации в процессе строительства. Одним из наиболее важных факторов при принятии решения о том, пользуется ли система или нет, является размер проекта, так как этот процесс принесет больше преимуществ, если здание будет меньше 40 000 квадратных футов. Еще один важный фактор, который следует учитывать, — это предполагаемое использование здания, поскольку более строгие строительные нормы требуют специального применения в бетоне, что затрудняет работу наклонных панелей. Большие склады, складские помещения и здание — идеальные проекты, на которых можно использовать систему. Типичная панель имеет толщину около 5 дюймов и может использоваться с разной высотой и шириной. Чем больше и больше панель, тем больше проблем и специальных требований вам необходимо будет, чтобы возвести и закрепить панель.
Преимущества наклонных стенок
В следующем списке представлены некоторые преимущества, полученные при использовании системы наклонной панели:
- Экономия — Требуется меньше строительных лесов, и процесс использует меньше бетонного материала. Кроме того, для этого процесса требуется меньше рабочей силы, чем конкретный бетон. Может применяться к LEED Credit M 5.
- Скорость — Если вы используете стены с надписью, расписание может быть сжатым, и проект будет завершен ранее. Процедура строительства может позволить нескольким профессиям работать в одном и том же месте, в то время как панели производят вне площадки, сокращая трудозатраты.
> Окружающая среда
- — Бетон выделяет низкий уровень летучих органических соединений и не ухудшает качество воздуха в помещении. Наклонные бетонные конструкции в городских районах a перерабатываются в материал для заполнения и дорожного основания в конце срока их полезного использования. Конверт
- — конверт здания завершается быстрее, поэтому зимой работа внутри здания может быть завершена заблаговременно, и в здании одновременно могут работать несколько профессий. Безопасность
- — Поскольку стены выливаются за пределы площадки, вероятность того, что авария произойдет на месте, будет меньше, однако работа крана во время установки может добавить дополнительные опасности для безопасности, поэтому будьте осторожны. Custom Build
- — Наклонные стены можно разливать для создания различных эффектов на фасаде. Отходы
- — Сокращение отходов с места работы, поскольку использование бетона, ребер, форм и другого сопутствующего оборудования меньше. Пожарная безопасность
- — Панели построены по соблюдению требований пожаробезопасности. Например, бетонная стена толщиной 6,5 дюймов может иметь огнестойкость в четыре часа или более. Ремонт
- — Процесс возмещения быстрее и проще, благодаря чему отремонтированная поверхность лучше соответствует оригинальной. > Более низкие эксплуатационные расходы — Толщина панелей обеспечивает большую изоляцию для арендаторов зданий, а также рассеивает полученную энергию. Кроме того, свойство звукоизоляции бетона превосходит.
- Архитектурные — Различные текстуры и поверхности могут быть созданы с наклонными стенами, уменьшающими потребность в покраске или добавлением архитектурных особенностей к этим стенам.
MSE Удерживающие стены Земли — это гравитация структуры, которые могут быть установлены только с небольшим оборудованием и идеально подходят для ограниченного пространства.
Стены для разделения гипса обеспечивают двухчасовую противопожарную защиту а также служат уменьшением шума между соседними устройствами.
Шаг за шагом по пути Постройте бетонную стену. Стены бетонных блоков также могут быть усилены и помогут уменьшить проблемы усадки.
What is Tilt-Up Construction?
Tilt-up construction describes a building construction method where frames are built on the job site in order to pour concrete wall panels on the ground, much like you would form a poured slab foundation. In this case however, provisions are taken to enable the poured concrete slab to then be ‘tilted up’ to turn this slab into a concrete wall. These concrete walls usually form the exterior of the building and are the main building structure, in lieu of other types of walls and building structures such as fabricated structural steel.
The walls are poured at the job site, typically using dimensional lumber forms, rebar and concrete. Additional materials may be applied or constructed into the wall as it’s crafted while laying on the ground including brick fascias, insulating materials, any coatings, wall lifting points and concrete-to-steel connection points such as embed plates. The forms enable the wall to be formed with key architectural details in place, such as windows and doors.
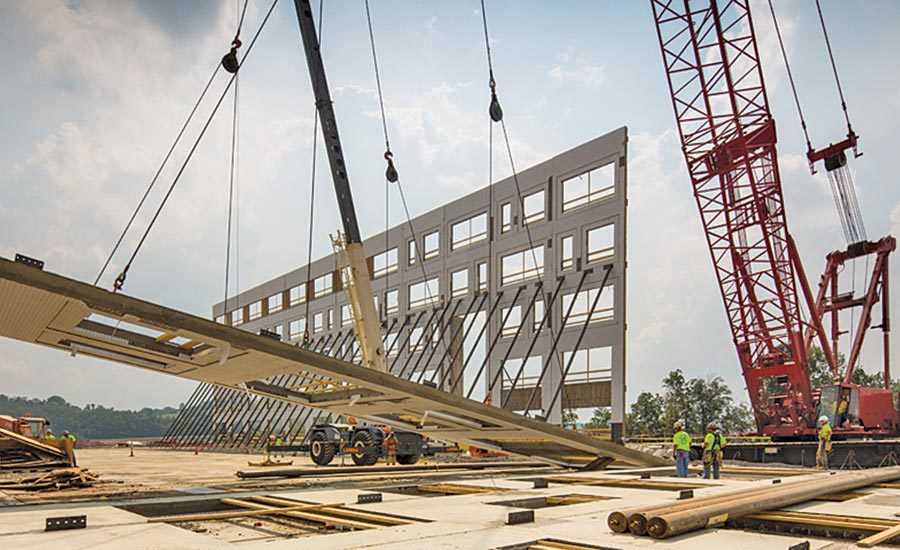
When the walls have cured in the forms on the ground, they are tilted up, usually using a crane as they can be quite large and heavy. The tilt-up walls are then moved into position and set on foundation footings. Each panel is braced after it’s moved into position until the walls are tied together to create a freestanding structure.
Tilt-up Construction Wall Placement — Courtesy the Tilt-up Concrete Association
If you’ve ever been around a home or small building construction site, you’ve probably seen the essence of ‘tilt-up construction’ where a studded wall is constructed laying flat on the floor and then a handful of workers tilt it up and hold it while it’s nailed into position. While the mechanics are somewhat the same, ‘tilt-up construction’ in professional circles usually refers to the poured concrete method described above.
You’re surrounded by tilt-up construction buildings! Any building that is relatively low-rise, that need only support a roof and that often has a large, open internal space is potentially an ideal candidate for tilt-up construction.
Typical Tilt-up Construction Project — Courtesy the Tilt-up Concrete Association
Many large retail environments and membership-based stores, warehouses and distribution centers use tilt-up construction walls with internal steel columns to support a roof that spans a very large square foot interior.
This video below walks through all of the key elements to understand Tilt-up Construction methods — courtesy Civil Engineering.
https://youtube.com/watch?v=yd3wjFn_KEw


Tilt-up Construction Frame from Video Above Showing All of the Embed Plates
History
In the early 1900s, Robert Aiken conceived the whole concept of tilt-up construction. While designing reinforced retaining walls at Camp Logan Range in Illinois, he got the idea of pouring concrete into wall-panels flat (like a cast) on the ground. Once the concrete dried, he titled the walls up, anchored them to the concrete footers and thus, tilt-up construction was born.
Aiken started using this construction method in a number of buildings all over Illinois. Thomas Edison, the famous inventor, saw tilt-up construction as the future of construction; and created an entire village with the construction method in Union, New Jersey in 1908. The village is still standing to this day.
The method gained true popularity in the 1940s, with the invention of mobile cranes, allowing the lifting of larger panels with ease. Since then, the tilt-up construction process has seen numerous technological upgrades and tweaks, making the method safer, economical, and much more convenient even in confined places.
Disadvantages Of Tilt-Up Construction
There are some drawbacks of tilt-up construction.
1. Not ideal for complex buildings:
Tilt-up construction walls work best for rectangular, large buildings or constructions, and may not be flexible enough for more complex designs.
2. Difficult to work with on some worksites:
Tilt-up walls are created directly on the worksite, which can be challenging if the worksite is not level or open enough to accommodate the casting process.
3. Lacking in versatility:
Tilt-up construction walls are not the best option for smaller projects, and insulated concrete structures may be a more flexible choice.
Recyclability
As it’s 100% recyclable, steel is a much more eco-friendly material than concrete. Lots of recyclable metal is sourced from demolishing old steel structures. This reduces the burden on the raw material mining industry and results in a manufacturing process that has a smaller environmental footprint. In the US, the long-span metal beams used in new steel buildings are made from around 95% recycled material. Thanks to the recyclability of steel, contractors can also benefit from LEED points. The owners of a metal building also get the opportunity to obtain a LEED certification. They can do this by utilizing energy-saving strategies that impact the complete cycle of a project, starting from eco-friendly construction practices right until the end of the project’s useful life. Effective strategies include opting for “greener” construction methods, materials and an array of other criteria. All of these will earn the project owner points towards their LEED certification.
The Size of the Project is a Huge Factor
Perhaps the biggest factor to consider is the size of the build project. If the size of the structure is less than 50,000 square feet, steel construction is generally the more cost-effective option. Although concrete is a much less-expensive material than steel, tilt-up construction typically involves extra fixed costs, such as large crane rentals, which make it more expensive than steel in projects of this size.
However, with projects exceeding 50,000 square feet, the significantly lower material costs begin to counteract the higher fixed costs of tilt-up construction, thereby making it cost-competitive with steel construction. Tilt-up construction might actually be more cost-effective for large projects where the walls aren’t a significant percentage of the structural costs. Scale is a big issue when you compare these two methods.
As metal has a superior spanning capacity than concrete, pre-fabricated steel buildings are the better option for structures that require longer bays and spans. This especially applies to office buildings, as metal buildings offer more flexibility in terms of floor space. The advantage with metal buildings is that the depths and locations of columns can be customized, which makes it adaptable to the majority of floor plans. This becomes of consequence if you want to remodel in the future. Concrete construction requires a greater number of support columns. This creates limitations in terms of usable square footage and the moving of partitions and walls. We’ll touch more upon customizability later in the article.
Preengineered steel building office tower with horizontal glass windows
One perceived a downside of long-spanning steel floors is that they tend to develop a “bouncy” characteristic over time. But thanks to superior damping, concrete tilt-up is much less likely to be plagued by this issue. However, builders can limit the deflection in steel floors by installing beams that possess higher rotational inertia.
Moreover, as steel members don’t require an overly complex foundation system, they’re a better option for construction sites with poor site stability. With concrete, cantilevering is much more expensive, as it demands carpentry and form set-up to hold the concrete in place until it cures. When you use steel joists for a cantilever, you only specify a full-depth cantilever or an extended end straight from the factory.
Also, you can use more glass on the project’s exterior with steel-framed structures. This greatly improves the building’s overall energy efficiency. Furthermore, it’s much easier and less-expensive to insulate a metal building compared to a concrete tilt-up one.
Overall, it’s safe to say that steel construction has the upper hand over tilt-up concrete in terms of customizability and versatility.

Commercial preengineered steel building architect office with garage doors.
What is tilt-up construction?
Tilt-up construction involves manufacturing large concrete panels which are then lifted/tilted into place by a crane. Tilt up panel construction has become an extremely popular method of construction for commercial and industrial developments for its ability to deliver rapid project completion.
Versatile in design, tilt up concrete walls require fewer joints, is highly durable and is more dense than brick, making it one of the most cost-effective methods of construction.
Where the confusion usually arises is where the concrete slab is poured and manufactured. Let’s take a look at how tilt-up construction works.
Технология Tilt-Up
Смысл этой технологии заключается в том , что панель, по размерам равная одной стене дома, изготавливается прямо на строительной площадке и затем устанавливается с помощью грузоподъемного крана прямо на фундамент.
Казалось бы, что здесь нового? — Обычное панельное домостроение. Не совсем так. Все дело в конструкции панели и технологии ее монтажа на фундамент.
Особенность монтажа заключается в том , что панель изначально своей нижней частью упирается в подошву фундамента, а затем медленно производится подъем ее верхней части, при котором панель, вращаясь вокруг гипотетической оси, идущей вдоль фундамента, поднимается до достижения ею вертикального положения.
Поэтому, для правильного использования технологии подъема необходимо очень точно рассчитать местоположение площадки каждой стеновой панели.
После подъема панели фиксируются с внутренней стороны фундамента дома специальными распорками, позволяющими точно выставить их по вертикали. Вся прелесть этой технологии в возможности упростить и ускорить бетонные работы, ведь на горизонтальной плоскости это делается гораздо проще.
Tilt-up Construction Cost
Our production and erection cost of tilt-up panel construction ranges from $90 per m2 to $120 per m2 fully installed but can be more expensive, depending on the thickness, size, shape and application.
These costs also don’t take into account support arrangements in terms of footings and roof steel and any surface treatments such as painting or cast in detail (panel grooves etc) and assume that panels don’t need casting beds and can be cast on the floor slab and propped back to the floor slab once erected.
These costs also don’t take into account the builders’ costs of supervision, insurances, warrantee, overheads and margin so they are unlikely to be the finished cost of tilt panels per m2 on your project.
For further specific costing relative to your project please reach out to us via our contact us form or by calling our office.
Why Is Tilt-Wall Construction Important?
Tilt-wall construction has numerous advantages that have contributed to its growth.
Tilt-up Wall Construction Is Cost-Effective
Compared to other construction methods, tilt-wall deliver significant value. Conventional wood framing consumes more labor, which drives higher project costs. Using premade steel framing means fewer design options, and traditional steel beams are significantly more expensive than concrete components.


Local supply availability also helps keep costs in check. It is generally easy to get cement, sand, gravel and rebar from a vendor close to the construction site, which reduces long, expensive material transportation journeys.
Lower labor costs are another factor making tilt-wall an economical approach. The work requires fewer employees than standard construction methods, so a small team of concrete professionals and a crane operator can get the job done. Savings compound as the project’s square footage grows.
Post-construction, tilt-up buildings continue to provide value to their owners. Concrete is highly durable, enabling it to withstand extreme weather events and resist fire. Those characteristics may help building owners save on their insurance premiums. Plus, concrete requires little maintenance, creating additional savings.
Tilt-Wall Construction Offers Design Versatility
Although this construction method is common for buildings like warehouses, you can use it for other project types. Modern technology allows for design options such as curved walls.
A range of finishing options is also available. Tilt-up engineering consultants like ECS can develop your specs to include different colors or textures. If you want a more decorative look, we can help bring that vision to life with siding or other aesthetically pleasing exterior coverings.
Tilt-Up Construction Supports Greener Practices
The primary way tilt-up contributes to eco-friendliness is through energy savings.
Reinforced concrete naturally provides insulative properties, which promotes higher energy efficiency. Your tilt-up construction company can work with your project engineer to create panels with additional insulation layers if desired.
This construction method uses significantly less energy in production as well. Projects requiring steel have a larger environmental impact since the material’s fabrication consumes significant resources.
Thanks to economical and efficient component use in casting, tilt-up also generates less waste than conventional construction approaches. These qualities mean shorter material deliveries and fewer trucks heading for the landfill to dispose of project debris.
Tilt-Wall Construction Promotes Faster Project Completion
When you embark on a construction project, you have a time frame in mind. You need a finished building to house operations or host tenants, and delays can be costly. Tilt-up construction offers an expedited way to get to the finish line.
What is Tilt-up construction?: Understanding the concept
There are many ways to build a long-lasting, quality building. Tilt-up construction is one of them. It consists in constructing the exterior structure of a building by lifting fabricated concrete walls that will function as the shell of said building. This method can be employed on any type of project. Nevertheless, it’s particularly useful when your client faces a tight delivery schedule or wants to maximize the visual appearance of the building while keeping future maintenance costs low.
The concept of Tilt-up construction is straightforward. In a (very) simplified way, it can be broken down into three steps: design, construction, and panel lifting.
Tilt-up walls are built over what we call a ‘concrete slab’ that also works as the facility’s interior floor. The walls are assembled around the facility’s perimeter. (See the image to visualize how every element interacts within the process).
- First, you must design and build the panel forms, which are the molds of your soon-to-be walls.
- Then you cast concrete into each panel, and in some time, it’ll become a solid concrete element.
- You lift the finished wall, place it in the desired space, and tighten it up to the steel structure of the building. Then, you repeat this process until you have the perimeter of your facility.
 The simplified Tilt-up construction process
Concrete Tilt-Up Walls
Concrete tilt-up walls can weigh up to 150 tonnes or more and are designed to work in conjunction with the roof and/or floor structures to resist all forces and function as load-bearing walls. To connect the walls to the roof and floors, steel plates with headed studs are secured into the forms prior to concrete placement. These attachment points are usually bolted or welded, and the upper attachment points are made to the roof trusses. Additional stiffness in the building structure can be achieved through the use of interior walls, known as shear walls.
Sandwich panels can be created by casting insulation as an integral part of the panel between two layers of concrete or applying insulation to either side of the panels. Concrete possesses the ability to absorb and store energy, making it high mass and able to regulate interior temperature (thermal mass). Furthermore, concrete provides soundproofing and durability.
Tilt-up buildings are fire-resistant, as with all concrete construction. Moreover, wall panels can be designed to sag inward when damaged, minimizing the risk of collapse. This feature can also be implemented with prefabricated panels.